
Want to learn how to make a wig? Look no further! In this article, we’ll take you through the step-by-step process of creating a beautiful and natural-looking wig you can wear with confidence. Whether you’re a beginner or an experienced wig maker, this guide has everything you need to know to create your own custom hairpiece.
Wigs have been around for centuries, used by people of all ages and backgrounds to change their appearance or hide hair loss. From ancient Egypt to modern-day Hollywood, wigs have always been a versatile and practical accessory.
But with the increasing popularity of wigs in recent years, prices have skyrocketed, making it difficult for many people to afford the perfect hairpiece. That’s where DIY wig-making comes in.
In this article, we’ll walk you through the making of your own wig, from preparing your workspace to caring for your finished creation.
How to Make a Wig
Time needed: 4 hours and 30 minutes.
Making your own wig can be an affordable and fun project that allows you to customize the look to your liking. Plus, you’ll have the satisfaction of knowing that you created something unique and beautiful.
- Preparing Your WorkspaceBefore you begin, it’s important to choose a clean and well-lit workspace. You’ll need a table or desk where you can spread out your materials and work comfortably.
Make sure you have access to a mirror so you can try on your wig as you go.
You’ll also need a few essential materials to get started, including a wig cap, hair bundles, needle and thread, and a wig stand.
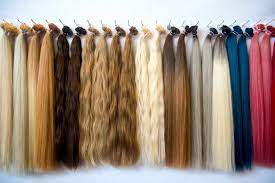
You can find these items online or at a beauty supply store. If you plan to make multiple wigs, consider setting up a wig-making station with all your materials organized and ready to go. - Choosing Your Hair BundlesOne of the most exciting parts of making your own wig is choosing the hair bundles. There are many options to consider, including synthetic hair, human hair, and even animal hair.
Synthetic hair is the most affordable option, but it can look less natural than human hair. Human hair is more expensive but can be styled and colored just like your natural hair.
When choosing your hair, consider the texture, color, and length. Do you want curly hair, straight hair, or wavy hair?
Do you want to match your natural hair color or try a bold new look? And how long do you want your wig to be?
Make sure you have enough hair to cover the entire wig cap, and consider buying extra in case you need to make adjustments. - Creating the Wig CapThere are several types of wig caps to choose from, including full lace, front lace, and u-part wigs.
Each type offers different advantages and disadvantages, so do your research before deciding.
To sew the wig cap onto the wig stand, you’ll need a needle and thread. Use a basic stitch to secure the cap to the stand, making sure it’s stretched taut.
This will ensure that your wig stays in place as you work. - Preparing the Hair Bundles Before you can start sewing the hair onto the wig cap, you’ll need to prepare the hair bundles.
Start by washing and conditioning the hair to remove any dirt or debris. Gently comb through the hair to remove any tangles or knots, and let it air dry or use a blow dryer to speed up the process.
Once the hair is dry, you can style it to your liking. Use a flat iron, curling iron, or rollers to create the perfect look. You can also color or cut the hair to customize your wig even further. - Sewing the Hair Bundles onto the Wig Cap Now it’s time to sew the hair bundles onto the wig cap. Using a ventilating needle, you’ll create small knots that secure each hair bundle to the cap. This process can be time-consuming, but it’s worth it to achieve a natural-looking wig.
Start by sewing the hair from the nape of the neck and working your way up towards the crown. This will create a more natural hairline and make it easier to blend the hair into your natural hair if you choose to leave some of it out.
As you sew the hair, make sure each knot is tight and secure. You may need to double knot some areas for added durability. It’s important to take your time with this process to ensure that the hair is evenly distributed and looks natural.
Once you’ve sewn all the hair onto the wig cap, try it on to make sure it fits comfortably and looks the way you want it to. You can make adjustments as needed, such as cutting the hair or adding more bundles for a fuller look. - Finishing Touches Now that your wig is complete, it’s time to give it some finishing touches. You can cut and style the wig to your desired length and shape, using a razor or scissors to create layers or bangs.
If you want a more natural look, you can also add baby hairs around the hairline or part.
To make your wig look even more realistic, consider using makeup to create a scalp effect. Use a foundation or powder that matches your skin tone to lightly dust the wig cap, then use a brown eyeshadow to create a subtle shadow around the edges.
Caring for Your Wig
To keep your wig looking beautiful, it’s important to take good care of it. Store it on a wig stand or mannequin head to help maintain its shape, and avoid storing it in direct sunlight or extreme temperatures. Use a wig brush or wide-tooth comb to detangle the hair, starting at the ends and working your way up.
Read Also:
If you need to wash your wig, use a gentle shampoo and conditioner made specifically for wigs. Avoid using hot water, as this can damage the hair, and let it air dry or use a cool setting on a blow dryer.
When to Replace or Repair Your Wig
While a well-made wig can last for years with proper care, eventually it may need to be replaced or repaired. Signs that it’s time to replace your wig include: excessive shedding, tangling, or thinning of the hair. If you notice any holes or tears in the wig cap, it may also be time for a replacement.
If your wig is in good condition but needs some minor repairs, such as a new wig cap or hairline adjustment, you can take it to a professional wig maker or try making the repairs yourself.
Making your own wig can be a fun and rewarding DIY project that allows you to express your creativity and create a look that’s uniquely yours. With a little bit of patience and practice, you can create a beautiful wig that looks natural and fits perfectly.
Remember to choose high-quality materials, take your time with each step, and take good care of your finished creation. Whether you’re a seasoned wig maker or a beginner, there are many resources available to help you along the way.
From online tutorials to local classes, there are plenty of opportunities to learn and grow your skills. So why not give wig making a try and create the perfect hairpiece for yourself today?

